What is EDI?
EDI (Electronic Data Interchange) is an electronic communication standard used for exchanging information between different electronic systems. SalesWarp has the ability to utilize EDI to communicate dropship order and purchase order data to and from external vendors. This enables a greater level of speed and autonomy between you and vendors.
NOTE: We strongly recommend talking with your vendor BEFORE setting that vendor to use EDI in SalesWarp. You will need information specific to them in order to set up EDI. Open communication before hand will avoid errors in set up and quicken the setup process.
In order to utilize EDI you must first make sure the vendor you are working with supports EDI communication. If the vendor does support EDI communications, they will need to provide you with the account number(s) and the vendors receiver identifier for you to use.
You will also need an FTP connection to handle the EDI transactions (your vendor may require you use one of their FTP connections rather than a personal one). Under Admin Tools -> Manage Connections you will want to ensure that the FTP connection you made specifies the outgoing path, incoming path, and archived path, as these will be required for the EDI data exchange.
Finally you will need to ensure that the event called "Edi" is enabled in the event manager.The event manager can be found under Admin Tools -> Event manager. Once there find the event named EDI. If it is disabled, click on the pencil ![]() button in the same row to edit the event and set the status as enabled. Click save when done.
button in the same row to edit the event and set the status as enabled. Click save when done.
Setting up EDI:
Option 1: Self setup
To begin setting setting up a vendor with EDI, navigate to PO/processing -> Vendors.
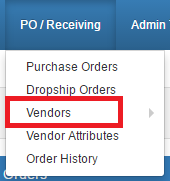
You will now be taken to the vendors page. Here you can either choose to setup a new vendor, or edit an existing vendor. For our example, we will be editing an existing vendor.
Click on the pencil icon ![]() in the row of the vendor you wish to edit.
in the row of the vendor you wish to edit.
If you want to use EDI for communication of purchase orders, reference the following steps:
Go ahead and click on the "Purchase Orders" column on the left hand side of the page.
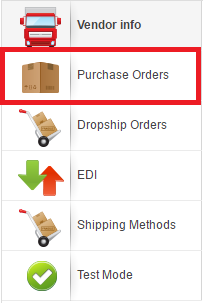
Under the "Process PO" drop down menu, select the EDI option.
.png)
You will then need to select the connection you want to use.
If you want to use EDI for the communication of dropship orders, reference the following steps:
Now, click on the "Dropship Orders" selection on the left hand side of the page.
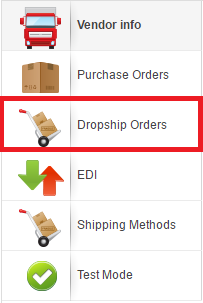
Find the drop down option that says "Process DO". Click the drop down menu and select EDI from the choices.
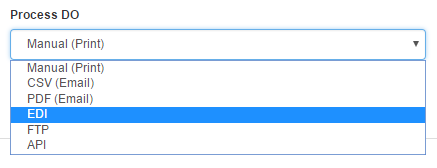
You will then need to select the connection you want to use.
Now, open edi.saleswarp.com/vendors in a new tab and sign in using your SalesWarp user name and password. On this page you will need to create a new vendor by click the "New Vendor" button in the upper right hand corner.
.png)
You will now need to give a name to this vendor (we recommend keeping this the same as the vendor you are making in SalesWarp).
.png)
You will also need to enter in the receiver identifier of the vendor. This may be specific to the vendor so we recommend contacting the vendor to inquire about the receiver identifier to use.
.png)
Under the client field, select your company name from the drop down menu.
.png)
NOTE: If you do not see your company name under the client field, you may have to add yourself to this webpage using the client tab.
.png)
In the "Spec & Version" section, use the drop down menu to select 004010 under X12.
.png)
The remaining fields on the page are optional and can be filled in if needed.
Click submit at the bottom of the page to save your changes.
.png)
You will be taken back to the previous page which will now show your vendor in the list. Take note of the vendors ID number on the very left hand column. This will be the ID you should enter under "Vendor EDI ID" in SalesWarp.
Once you have done the above, return to SalesWarp and click the column labeled "EDI" on the right hand side of the page.
The account numbers for EDI that you need will need to be provided by the vendor. If the vendor gives you multiple account numbers to use be sure to enter each account number on a new line in the text box. You will also need to enter in the vendor EDI ID you took took note ave earlier.
.png)
Be sure the information is entered in correctly, and that the "Disable sending EDI?" switch is turned off (red color).
Be sure to click on save in the upper right hand corner to save the changes you made!
Your EDI connection is now ready!
Any time you utilize the vendor that is setup for EDI, you will see a field called "process order" that should show EDI.
.png)
You can see monitor the EDI communications between SalesWarp and your vendor by viewing the DS log/PO log on the left hand side of either your dropship or purchase order. This will show you the status of the files received as well as the change in order step that occurs when these files come into SalesWarp.
.png)
.png)
NOTE: Dropship orders utilizing EDI will complete automatically with out any sort of user input after sending the dropship order to the vendor. Purchase orders will process almost completely, but will require you to manually confirm you have received your purchase order before the order can be marked as complete.
Option 2: SalesWarp setup
If you do not want to set up the EDI connections yourself, our team at SalesWarp can setup the EDI connections for you, HOWEVER, you will be billed for this service per the hourly rates mentioned in the customer support overview section. If you are interested in doing this, contact us and we will get back to you with an invoice for the service.
If you have any questions or require further assistance, please feel free to contact us at support@saleswarp.zendesk.com