Prerequisites:
In order to use Magento in SalesWarp, you will first need to install the SalesWarp Magento connector. We will walk you through how to get it set up:
Before you get going...
•Check that your Magento version is compatible with the plugin (CE 1.6.2, CE 1.7, CE, 1.8, CE 1.9). The version of your Magneto store is located in the center of the page footer at the bottom of every screen in the admin tools.
•Verify that you have Search Engine Optimization ("SEO") friendly URLs enabled in your Magento Store
•Ensure that you have access to the Magento Connect Manager within your Magento store
If you are missing one of the prerequisites or need help checking for them, feel free to contact our onboarding team for help, or follow these instructions:
|
Step 1: |
Using your store's admin credentials, login to the admin panel of your Magento Store.
|
|
Step 2: |
Hover over System in the menu, and then Magento Connect, then choose Magento Connect Manager.
|
|
Step 3: |
You should see the following screen - at the bottom it lists any connectors you have already installed. If you see SalesWarp OMS you're all set for processing orders through Magento. You may also see SalesWarp Publisher (which is for passing product info to the storefront) If the OMS plug-in is not already installed, continue to the next instructions.
|
|
Step 4: |
If you do not already have a Magento Connect account, you need to register for one before installing the plug-in. This link opens in a new window. When registration is complete, close that window to return here. |
|
Step 5: |
Next, open the SalesWarp Order Manager plugin page on the Magento Connect Store, and click Install. This link will open in a new window, when installation is completion, you may close that window to return here.
|
|
Step 6: |
You may be prompted to enter your store credentials again. Click in I Agree check-box, then Get Extension Key. This link opens in a new window. When installation is completion, you may close that window to return here.
|
|
Step 7: |
Click Select Key button, right click on the text area and select copy, to copy the extension key to the clipboard.
|
|
Step 8: |
Return to the Magento Connect Manager (see above if you cannot find your way back) and paste (right-click->paste)the Saleswarp OMS key into the field in the Install New Extensions section,and click the Install button.
|
|
Step 9: |
A table will display with the plug-in being installed. Click Proceed to continue. You will activity in the command window, just confirm you have success messages when complete, and click Refresh. You should now see the SalesWarp OMS listed as installed in the list at the bottom of the Magento Connect Manager. If you receive any errors during this process, or the plug-in does not install correctly, do not hesitate to contact your onboarding team.
|
|
Step 10: |
Logout of your Magento store's admin dashboard and log back in. This is very important - it add Saleswarp as a configuration item to your Magento admin menu. |
|
Step 11: |
Once again access System, then Configuration, and you will see the new option for the SalesWarp Order Manager plugin. Click Settings.
|
|
Step 12: |
Generate Unique SalesWarp Registration Key. Click this menu title to expand the section if not already expanded. Click Get Key. Once you have generated a key it will then be visible whenever you visit the SalesWarp settings. This key is required to set up your Magento store in Saleswarp. Copy the key to the clipboard and head there now, or contact your Onboarding team for assistance in setting up SalesWarp to communicate with your Magento store.
|
.png)
.png)
.png)
.png)
.png)
.png)
.png)
.png)
.png)
.png)
.png)
.png)
Store Setup:
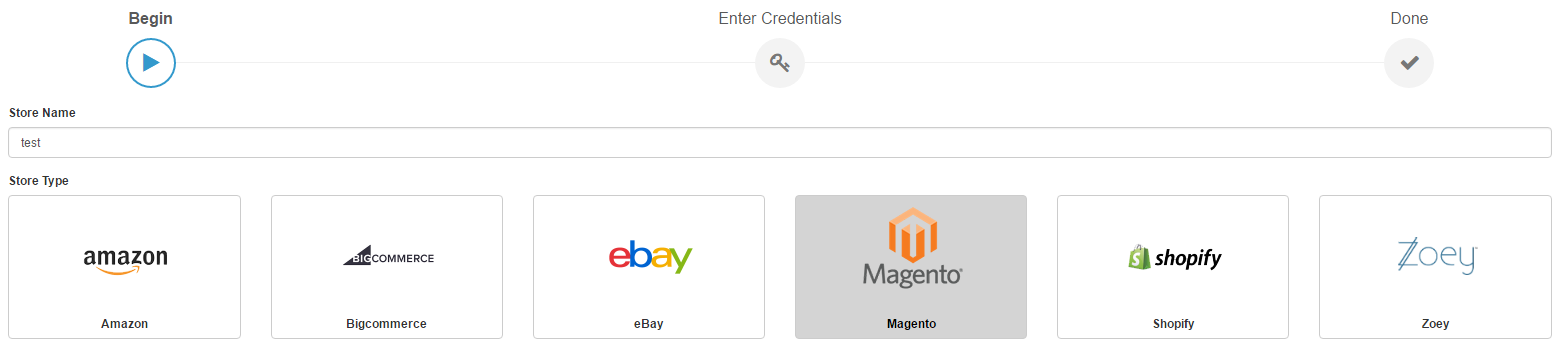
Once you've configured on the Magento end, you can continue to set up you Magento store in SalesWarp. From the Stores menu, choose Stores -> Add New Store. If you're already on the Stores list, click the Add New Store Button. The system will begin stepping you through all the required integration data with the selected storefront.

Enter a name for your store front and select Magento from the tile menu. Click next in the upper right hand corner.
Fill in the fields shown as follows:
|
Connection type: |
Rest API |
|
Code for Magento Store: |
base (can be verified in the Magento admin panel under "System/Manage Stores") |
|
Custom API URL: |
https://dev.MagentoStoreName.com/demo/magento/customapi/fastapi (where MagentoStoreName is your store or domain name.) |
|
Magento API Hash Key: |
obtained in the Magento admin panel under System, configuration, SalesWarp Unique registration key - you must have already installed the SalesWarp Order Manager Connector |
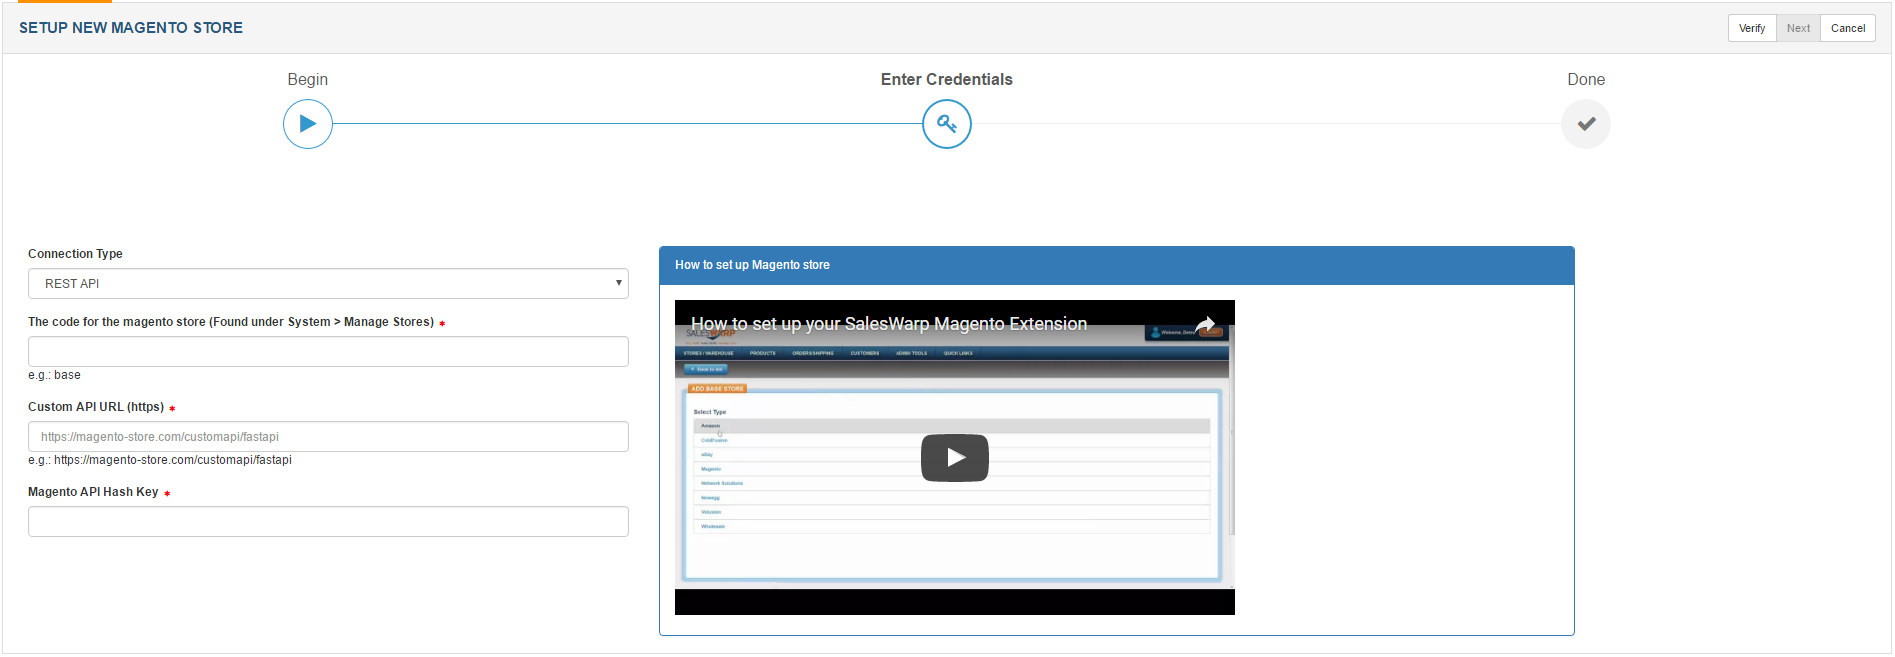
Enter the information and click verify in the upper right hand corner.
Your Magento store is now ready to be used! Refer to the managing store preferences section, to begin modifying your stores options.
If you have any questions or require further assistance, please feel free to contact us at support@saleswarp.zendesk.com