Feed templates are used to quickly and efficiently export products from SalesWarp to a .CSV file specifically formated for another store feed. An exported feed template from SalesWarp will be able to be directly imported into a store feed, without any user modification.
Feed templates currently support the following stores:
•eBay
NOTE: Sears and Google have special set up instructions and are covered in their own sections under feed templates.
Begin navigating to Stores -> Feed Templates.
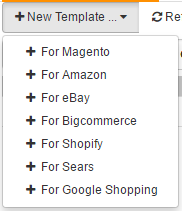
On this page, click on the "New Template" button in the upper left hand corner. From the drop down menu that will pop up, choose the store front your feed template will be used for. In our example, we will be using magento, but you can use which ever one you'd like.
You will now be brought to the new feed template page. Here you will need to give your feed template a name,and specify which categories in SalesWarp you want your feed template to apply to (if you want it to apply to all categories keep all categories selected).
.png)
Now, click on the second button on the left hand side of the page (ours says magento fields). This will bring up fields that will need to be mapped to a product attribute field in SalesWarp, or assigned a fixed value. The choice to use a fixed value or a field depends on what you need the data to reflect in the feed template.
.png)
The ![]() symbols next to each field will give you an insight on what data the field requires.
symbols next to each field will give you an insight on what data the field requires.
Once done, click save in the upper right hand corner. Your feed template will now show up in the feed template list!
![]()
Now, generate your feed template by clicking on the gear icon ![]() in the same row as the feed template. Once your feed template is generated it will show up as a link in the feed template list. You can click on the link to download a copy of the .CSV file that the template generated or copy the link URL (some store fronts require the URL rather than the file itself).
in the same row as the feed template. Once your feed template is generated it will show up as a link in the feed template list. You can click on the link to download a copy of the .CSV file that the template generated or copy the link URL (some store fronts require the URL rather than the file itself).
From here, we will specify the steps for each storefront to implement the feed template that was just generated.
1.Log into your Magento admin area to upload file.
2.Then look for the Import / Export sub menu under main System menu.
3.Click Import sub menu.
4.Select "Products", then "Append Complex Data".
5.Click Browse to find your file you already created.
6.Then click Check Data to upload.
7.If your file is good, then you will see all green text and an Import button.
8.Click Import to complete upload.
9.If you see any errors in your file, you will need to fix the issues and upload again.
1.Log into your Amazon Seller Central to upload file.
2.Click on the Inventory menu tab, then click Add Products via Upload.
3.Next click the 2nd tab that says Check and Upload your Inventory File.
4.Go to step 2 and click the Upload button to import your file.
5.Select "Inventory Files for non-Media Categories".
6.Next click the Browse button to find your file.
7.Add your email address to be notified when the upload is completed.
8.Click the Upload button.
9.You will get an email when the upload is completed to check your results.
1.Log into your ebay admin area to upload file.
2.Click this link to eBay file exchange.
3.Next, click the Upload Files link on the left hand side.
4.Click the Browse button and find your file.
5.Then click the Upload button.
6.To view your results, click on the View Upload Results link on left side
7.Find your file, then click the Load Results Report download link on the right side.
1.Log into your Bigcommerce admin area to upload file.
2.Click on Product link on the left hand side menu. Then click Import.
3.Under File Details section, click Browse button to find your file.
4.Then click the Next button in bottom right corner.
5.Click the Next button again. Then click Start Import.
6.If file is correct then you will see number of products imported successfully.
7.If errors were found. Click on More Information to learn how to fix.
1.Log into your Shopify admin area to upload file.
2.Once logged into Shopify, click the Products link in top left corner.
3.On the Products page click Import in top right corner.
4.In the pop up screen, click the Browse button and find your file.
5.Then click the Upload File button in right side.
6.Review your import then click the Start Import button.
7.If your upload was successful, you will be directed back to the main product page.
8.If your file had issues, you will see them in a pop up screen.
If you have any questions or require further assistance, please feel free to contact us at support@saleswarp.zendesk.com