Warehouse locations allow a greater level of organization within your warehouses. Using locations with your warehouse allows you to move product into differing states that can change the status of product in that location.
For example: moving a certain amount of product from a regular location to a backstock location could make that amount of product sellable, but no pickable, ensuring that the product in a regular location would be picked before the backstock product, while still allowing the backstock product to be shown in the warehouses QOH.
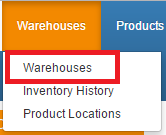
To enable a warehouse to use locations, first navigate Warehouses -> Warehouses.
Click the pencil ![]() button next to the warehouse that you want to edit. On the left hand side of the edit screen click on the "Locations" tab.
button next to the warehouse that you want to edit. On the left hand side of the edit screen click on the "Locations" tab.
.png)
On this screen you should see a message telling you that this warehouse is currently using locations.
.png)
Click on the red button that says "Change this warehouse to manage inventory by locations". A pop up will appear that will walk you through the process of setting up a warehouse location.
You will first be prompted to choose the location format (either dot separated or dash separated) and the location prefix for your barcode.
.png)
Next you will be prompted to make your location barcodes.
.png)
NOTE: At a minimum, you will need to make one barcode for regular, returns, receiving, and fulfillment types.
First, enter in your barcode in the location field. If you are entering it in by hand, include the barcode prefix.
.png)
Next, under the type, choose what type of barcode this is using the drop down menu.
.png)
Under the label field, you may enter a name for this location if you would like, however it is not required. You can also enter in a description for this location under the description field as well.
Finally, you can choose if you would like to have inventory in this location be sell-able and/or pick-able. If you want poduct that is in this location to be sell-able/pick-able, check their respective check box's below the location and type fields. If those box's are left unchecked the inventory in this location will not be available for sale and/or not be available to be picked.
.png)
NOTE: If you choose to make the product in this location pick-able, an option to show the warehouse location on the pick ticket will become available. If you want to enable this option simply check in the "Display on Pick Ticket" check box.
When you want to save this location click the submit button below the description box.
.png)
Your barcode will show up in the "Locations" table at the bottom the pop up window.
.png)
Repeat the same process till you have created all the barcodes you want. When you are done click next in the bottom right hand corner of the pop up.
On this next screen you will need to choose the default product, receiving, returns, and fulfillment locations. If you only created one ware house for each of those types this should not require any modification. Click next when ready to proceed.
Finally the process should be finished. Click finish in the bottom right hand corner of the pop up. You will be notified that inventory in this warehouse will now be managed by location.
The locations tab will now show the locations you just made.
.png)
Be sure to click save to keep save the changes you made to this warehouse!
If you have any questions or require further assistance, please feel free to contact us at support@saleswarp.zendesk.com