The product location manager is the tool used to do a number of things with inventory in SalesWarp:
•Add inventory to a warehouse location
•Remove inventory from a warehouse location
•Move inventory between locations inside the same warehouse
•Transfer inventory between different warehouses
•Search for locations that contain a product
NOTE: The product location manager extensively utilizes warehouse locations. Many features of the product location manager will not be available if you have not set up warehouse locations.
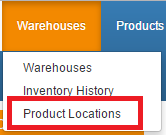
To find the product location manager, navigate to Warehouses -> Product locations.
Prerequisite:
Before you can utilize the product location manager, you must first set at least one of your warehouses up to use locations.
To add inventory into a product location, select the "Add Inventory" tab at the top of the page. To remove inventory from a location, select the "Remove Inventory" tab at the top of the page.
.png)
Begin by choosing the warehouse you want to work with from the warehouse drop down menu.
.png)
Next, scan (or type) in the product location barcode for the product location you want to manage.
.png)
A new section will now appear at the bottom of the page. You will now see a list of the products currently in this location, and the quantities of each product in this location. This list will update as you add/remove inventory from the location in the next step.
.png)
Now, enter in the quantity of the product you want to add into the location, then scan in the products SKU.
.png)
The list at the bottom of the page will now reflect the inventory changes you just made to the location.
.png)
To move inventory between product locations select the "Move Inventory" tab from the top of the page.
![]()
Begin by selecting the warehouse you want to work with from the warehouse drop down menu.
Next, scan in the location barcode of the source location of the product.
.png)
Now, scan in the location barcode of the destination location for the product.
.png)
NOTE: The locations you want to move between must be in the same warehouse in SalesWarp. To move product between warehouses check out the transfer inventory section.
At the bottom of the page you will now see some new object have shown up.
.png)
The table on the left shows inventory in your source location, while the table on the right shows the inventory in your destination location.
The swap side button in between the two lists allows you to quickly swap the locations destination and source statuses, enabling you to move inventory between the two locations, without requiring you to rescan in the locations each time you want to switch the location designations. The move all button allows you to move all the inventory in the source destination into the destination location all at once, without needing to scanning in each product SKU.
.png)
The arrow buttons next to each product in the source location allow you to move all quantity of that product in the source location into the destination location, with just a click.
.png)
To specify the amount of a product to move from the source location to the destination location, enter in the quantity you want to move in the "Qty." box at the top of the page, then scan in the SKU for the product you want to move.
.png)
The changes you make to the inventory between your locations will be actively reflected in the location table on the lower part of the screen.
.png)
To transfer inventory between different warehouses, click the "Transfer Inventory" tab on the upper part of the page.
![]()
Begin by selecting the source and destination warehouses from their respective drop down menus on the page.
.png)
Scan in the source location barcode that is in your source warehouse.
.png)
Now, scan in the destination location barcode that is in your destination warehouse.
.png)
At the bottom of the page you will see that some new objects have appeared.
.png)
The table on the left shows inventory in your source location of your source warehouse, while the table on the right shows the inventory in your destination location of your destination warehouse.
The swap side button in between the two lists allows you to quickly swap the warehouses destination and source statuses, enabling you to move inventory between the two locations, without requiring you to rescan in the locations each time you want to switch the location designations. The move all button allows you to move all the inventory in the source destination into the destination location all at once, without needing to scanning in each product SKU.
The arrow buttons next to each product in the source location allow you to move all quantity of that product in the source location of the source warehouse into the destination location of the destination warehouse, with just a click.
.png)
To specify the amount of a product to move from the source location to the destination location, enter in the quantity you want to move in the "Qty." box at the top of the page, then scan in the SKU for the product you want to move.
.png)
The changes you make to the inventory between your locations will be actively reflected in the location table on the lower part of the screen.
.png)
To list the the inventory a location is found, click on the "List Inventory" tab at the top of the page.
![]()
Scan or type in the SKU you want to search for in the product box at the top of the page.
.png)
At the bottom of the page a list will show the warehouses and the locations where the product is located, as well as the quantity of the product in the locations and if the product is sellable.
.png)
If you have any questions or require further assistance, please feel free to contact us at support@saleswarp.zendesk.com