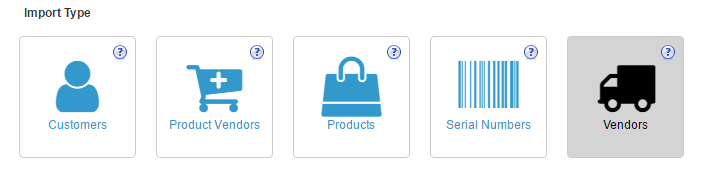
Under the import page, begin by selecting the vendor tile.
Next, choose the .csv file containing the vendor information. If you need a template .csv file to work with, you can download one using the box called "download sample" on the right side of the page.
Once you have chosen the file containing your vendor information, you will need to choose the mode for the import.
Modes:
|
Create & Update |
will update any changes from the file for existing items, will add any new items from the file to the product database |
|
Create Only (ignore existing) |
will ignore any existing products in the file |
|
Update Only (ignore new) |
will ignore any new products in the file |
Keep the attribute set as default.
.png)
Once you have all your import settings chosen, click next in the upper right hand corner.
Now you will have to map the fields for your import.
NOTE: SalesWarp does not currently support the automatic mapping of fields. The data under the "Map fields automatically" will always have an x under field found.
If you do not already have a mapping created for your import, click the "create new mapping" tab.

Here you will find the columns you are required to map, as well as the columns in the .csv file that are currently un-mapped.
.png)
Assign the unmapped fields, on the right side of the page, to their equivalent fields in SalesWarp. As you fill in the fields you will see the fields you have assigned, move to the "mapped" column. Once done, click next.
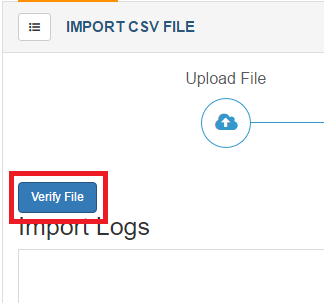
Click "verify file". If all the data came over ok you will get a message saying all the data is correct, and will be sent to the next screen.
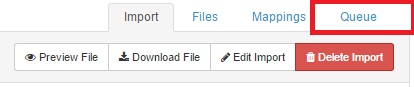
You will now be on the import screen. Here you can choose to import the file, delay the import, edit the import, view the file, download the file, or delete the import.
.png)
Depending on the file size of the import, you may not be able to import instantly. If that is the case you will have to use the import later option. This will put your file in a queue to be completed at a later time. You can view th imports progress in the queue by clicking the queue tab in the upper right hand corner.
Once finished, you can review your vendors by viewing the vendors menu, under the PO/Receiving tab.
If you have any questions or require further assistance, please feel free to contact us at support@saleswarp.zendesk.com