What you need to know before you build your product import file
In most cases you are going to want to manually map the fields in your product file, and ideally you should ensure that all of your column headers match the field definitions for ease in mapping. Particular items that require manual mapping occur when importing product data for variations or kits, as you have to provide some additional information on how the data is ultimately configured in SalesWarp.
When compiling data from your existing system, you will very likely find that additional import data is easier to combine into a single file. You can actually use the same data file (or a file with minimal alterations) for additional types of imports.
You may choose to include Vendor or Location info in your product file that can be utilized in Product Vendor or Product Location imports, as well as Images, categories, configurable products or kits.
When performing multiple imports of type CREATE, the one thing you must remember is that you always need to include/map the required fields for each type of import.
Configurable Products: Formatting a import file to successfully import variants.
The easiest thing to do is to import all your simple items first. These items may be configurable (have variants for size/color, etc) or belong to kits, but each simple item can also be sold individually by its own SKU.
Example Variants of Size and Color
In Cell B1, BBRPC is identified as the Parent Core SKU, and E1 identifies the Variation_Names, separated by a delimiter. In subsequent rows the Variation_Values are included in the SKU and in the variation value column, as well, again, separated with semi-colons.
The first row of a group of configurable SKUs is used to declare a base SKU and the types of variants it has, before listing the variants (simple SKUs). When including multiple variants, the order in which you include the variant VALUES (here in column F) must match the order in which the variation NAMES are defined (here in column E)
|
|
A |
B |
F |
G |
H |
|
1 |
Type |
Product Name |
SKU |
Variation_name |
Variation_value |
|
2 |
configurable |
Widget 1 |
W1 |
color;size |
|
|
3 |
simple |
Widget 1 - Azure |
W1A |
|
Azure |
|
4 |
simple |
Widget 1 - Black |
W1B |
|
Black |
|
5 |
simple |
Widget 1 - Canary |
W1C |
|
Canary |
|
6 |
simple |
Widget 1 - Dirt |
W1D |
|
Dirt |
|
7 |
simple |
Widget Holder |
W9 |
|
|
Kits are groups of products that are sold as a single unit. For instance, a motherboard, hard disk, video card, power supply, memory and case, would be kitted to make a complete PC. You sell all of these products Kits generally must be imported separately from configurable items. The main reason being that a given SKU may only appear in the file once. Because two of WCALL are required in each kit, there would have to be separate files for each import. The kit SKU needs to exist or be present in the file prior to any components.
One file for Widget Kit 1 in Azure
|
|
A |
B |
F |
G |
H |
|
1 |
Type |
Product Name |
SKU |
kit_sku |
component_quantity |
|
2 |
kit |
Widget Kit 1 |
WK1 |
|
|
|
3 |
simple |
Widget 1 - Azure |
W1A |
WK1 |
1 |
|
4 |
simple |
Widget Holder |
W9 |
WK1 |
2 |
One file for Widget Kit 2 in Azure
|
|
A |
B |
F |
G |
H |
|
1 |
Type |
Product Name |
SKU |
kit_sku |
component_quantity |
|
2 |
kit |
Widget Kit 2 |
WK2 |
|
|
|
3 |
simple |
Widget 1 - Black |
W1B |
WK2 |
2 |
|
4 |
simple |
Widget Holder |
W9 |
WK2 |
2 |
Product Importing:
Begin by uploading your CSV file containing your products.
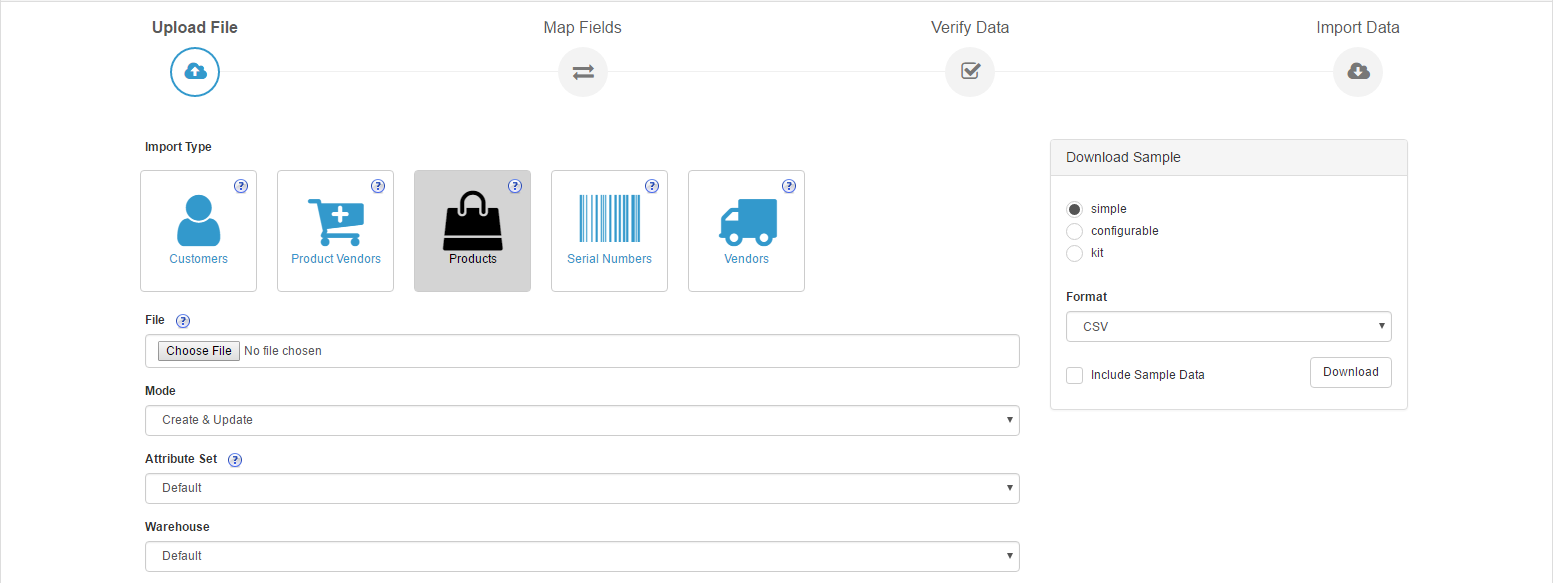
|
Type: |
Choose "products" |
|
File: |
Choose CSV file – see attached field definitions for file format. The fields in the CSV file are NOT required to be in any specific order. |
|
Mode: |
Option 1: Create and Update – will update any changes from the file for existing items, will add any new items from the file to the product database. The fields where data is REQUIRED in the file are listed in the figure above on the right side of page.
Option 2: Create Only – will ignore any existing products in the file. The fields where data is REQUIRED in the file are listed in the figure above on the right side of page.
Option 3: Update Only – will ignore any new products in the file. The only REQUIRED field is SKU, and the other fields you want to update. |
|
Attributes set: |
for user defined attributes not covered by default fields. Will be covered separately as an advanced topic. |
|
Warehouse: |
Select default unless directed otherwise |
Next, you will need to create your file mappings.
You will almost always need to map your import, as you will likely not have data for every single data point available in the file. Furthermore, if you do not have data in any particular data column for ANY product, then you will want to remove it from the file.
If you are updating fields, you will wan to have data in every single row, unless your intention is to remove data from any given record. A blank record in the import, in either a create and update, or create only type import will overwrite existing data with nulls or empty fields. When you move from Step 1 to Step 2, choose Create New Mapping, and the import Mapping Details screen will display.
NOTE: required to always include the SKU, Unit Price (selling price), MSRP, Type (simple, configurable, kit), and the Product Name, in product create or create and update mode.
If you have ensured that your column names match the import file field definitions, then mapping shouldn't be that hard. Anything with a red asterisk * is required, so make sure you map those (the system will remind you if you haven't!)
Settings: We'll tackle each item on the settings screen separately.
|
Map the core SKU
When you type in the field, the system displays fields from your CSV file to assist with mapping. (all the fields displayed in the figure to the right contain "S") |
|
|
Set Configurable products to YES, and continue mapping individual items as required.
Configurable products are the same underlying product with variations such as color and size. Apparel for example - you sell a basic Tee, it comes in five colors and five sizes.
•Product Type (simple, configurable, or kit). The Configurable row shows a base SKU and the variants in the variation NAME fields
•Map Parent SKU (likely contains the same value as your core SKU)
•Map Variation NAME field (i.e. color, size)
•Map Variation VALUE field (i.e. Red, L)
•If you have multiple variations, you must specify a delimiter between the values, a semi-colon was used here – "Red;L"
NOTE: that the variation values must be in the same order as the variation names and variation names must be listed in alphabetical order |
|
|
Map KIT info
•Select KIT SKU Field.
•Select the KIT Component quantity field. This signifies how many of each of the SKU on this row are included in the kit. A PC kit might require 2 sticks of memory, for example. |
|
|
Map Image info
•As a general rule, always check "replace images".
•Select whether you are pulling images from a single file folder, pointing to URLS, or names of images previously loaded.
•You have the ability to specify more than one image per SKU, if you have more than one view of the product or its variants. Multiple images per SKU must be separated with a delimiter. Again we recommend not using a comma. We've used ";".
If your images are stored locally on a PC or network drive, you can bulk upload the images directly into SalesWarp. A suggestion to simplify imaging is to have your images be the same as your SKU or Product ID and incorporate variants into the image name.
Devise a structure to consistently name your images. Example: Base SKU 12345 for a pair of denim jeans that come in black and blue, with a front and back shot. You could refer to them in the image field as follows.
12345BLU-F.jpg;12345BLU-B.jpg 12345BLA-F.jpg;12345BLA-B.jpg |
|
|
Specify Product Category fields
•Change selection to YES
•Specify the category name field
•Specify the main category delimiter (as described in the "what you need to know" section above)
•Specify the sub-category delimiter (also described in the "what you need to know" sectionabove) |
|
|
Product Codes refers to additional SKU/product identifiers such as UPC codes, or Amazon ASINs. You could potentially include UPCs in your general product file, but if you have multiple types of product codes, i.e. UPCs and ASINs, etc then they would likely be separate uploads. You cannot load two different types of product codes at the same time, for instance you could not include UPCs and ASINS in the same import. Additionally, you can only include a single vendor for each code.
•Map the product code field from the file
•You really cannot have more than one type per code, so if you have UPCs for ebay and ASINS for Amazon, for example, you'l have to import those in separate imports. You could use the same file, but you'd have to have an ASIN column and a UPC column, and only specify one per import.
•Select the type of product code UPC, ASIN, ISBN or Other
•Select Vendor who is providing those products |
|
|
Auto Publish. Do not auto-publish at this time. You can use the import functionality later on to turn it on, however, you want to review SalesWarp and make sure everything is good first, then opt to publish out to storefronts. |
|
.png)
.png)
.png)
.png)
.png)
.png)
.png)
Product Info Tab:
NOTE: for Create or Create/Update modes, there are two required fields, (Type: simple, configurable or kit) and Product name, It is most efficient to include as much product data as you have at one time, but know that you can come back an import individual or multiple data elements later if they should change or need to be updated.
.png)
.png)
Meta Info Tab: Nothing required here, but useful for storefronts that accept this data.
.png)
Dimensions Tab: Extremely helpful to include this information for shipping purposes. We can also enable a weight field on this tab if needed for shipping purchases.
.png)
Price Tab: (Unit price and MSRP are required on this tab) MSRP is useful for showing on storefronts your discount on MSRP, or even discount on your original selling price.
.png)
Reorders Tab: contains a single field. when stock hits the number in this field a PO will automatically be generated to the default vendor for replenishment. When created, these system POs will display in the PO/Receiving menu under Purchase Orders for approval and further processing. Leave this field BLANK if not utilizing this functionality
.png)
Finally, Press the Verify File button and the system will read the file data, and you will be alerted to any specific issues to the file FORMAT that need to be corrected prior to importing. If there are no issues with the file, the file will allow you to import now, or may force you to "Import Later", which will place the file in the processing queue.
To monitor files that have been queued press “back to list” button in top left hand corner, and then the queue button on the far right - you will be able to see if the file has begun or finished processing. Note you may need to hit the refresh button on your browser.
Once the queue shows the import Finished, review the results and if there were no issues in the file, then review some products.
To review the results Go back to the import tab and you'll see something similar to this below. If you were conscientious building your file, you should have all successes, but you may see some errors, warnings, or additional info. You will get an indication of the number of each type of notification, and he import logs will show you what errors you have to contend with.
If you have any questions or require further assistance, please feel free to contact us at support@saleswarp.zendesk.com